使用mkcert创建自签名ssl证书
官方文档:https://github.com/FiloSottile/mkcert#mkcert
mkcert工具下载链接:https://github.com/FiloSottile/mkcert/releases
理解:
要想生成浏览器信任的本地自签证书,那么我们需要一个弄一个CA证书颁发机构,以后生成的证书在这个机构做签发,mkcert自动信任CA,不需要我们做什么。
证书的使用:
如果你有一个java项目部署在10.1.30.51服务器上,那么我们需要给51这个服务器颁发一个证书,并把生成的公钥和私钥配置到项目中,当你在其他ip的浏览器中访问时,你只需要安装mkcert的CA根证书即可,https就会变成受信任。
# 下载安装
首先,根据自己的系统,下载最新的二进制文件,这里我下载的版本为 v1.4.3:
[root@localhost ~]# wget -O mkcert https://github.com/FiloSottile/mkcert/releases/download/v1.4.3/mkcert-v1.4.3-linux-amd64
为二进制文件添加可执行权限,并移动到 $PATH 中:
[root@localhost ~]# chmod +x mkcert
[root@localhost ~]# mv mkcert /usr/local/bin/
2
检查 mkcert 的版本:
[root@localhost ~]# mkcert -version v1.4.3
# 使用说明
# 1、生成证书
mkcert 生成证书的命令很简单,格式如下:
mkcert domain1 [domain2 [...]]
多个域名/IP用空格分隔,一个自签名的证书可以这样创建:
[root@localhost ~]# mkcert 192.168.128.134 example.com localhost 127.0.0.1 ::1
Note: the local CA is not installed in the system trust store.
Note: the local CA is not installed in the Firefox and/or Chrome/Chromium trust store.
Run "mkcert -install" for certificates to be trusted automatically

Created a new certificate valid for the following names
 - "192.168.128.134"
 - "localhost"
 - "127.0.0.1"
 - "::1"

The certificate is at "./192.168.128.134+4.pem" and the key at "./192.168.128.134+4-key.pem"

It will expire on 7 September 2023
2
3
4
5
6
7
8
9
10
11
12
13
14
在这个证书中,192.168.128.134 是服务器的内网地址。命令执行后会生成两个文件:192.168.128.134+4-key.pem 和 192.168.128.134+4.pem,前者是私钥,后者是证书。
# 2、使用证书
把对应的文件配置到nginx的配置文件中
#cert/192.168.1.148+4.pem 对应的就是你生成的私钥和秘钥,+4代表你包含4种
#nginx.conf
ssl_certificate cert/192.168.128.134+4.pem;
ssl_certificate_key cert/192.168.128.134+4-key.pem;
2
3
4
# 3、安装认证机构
执行以下命令将 mkcert 的认证机构安装到服务器上:
[root@localhost ~]# mkcert -install
CA 证书的位置可以通过以下命令查看:
[root@localhost ~]# mkcert -CAROOT /root/.local/share/mkcert
# PC端安装
将 rootCA.pem 复制到 PC 上,并将其后缀改为 .crt。

双击 rootCA.crt,根据提示安装证书,步骤如下:
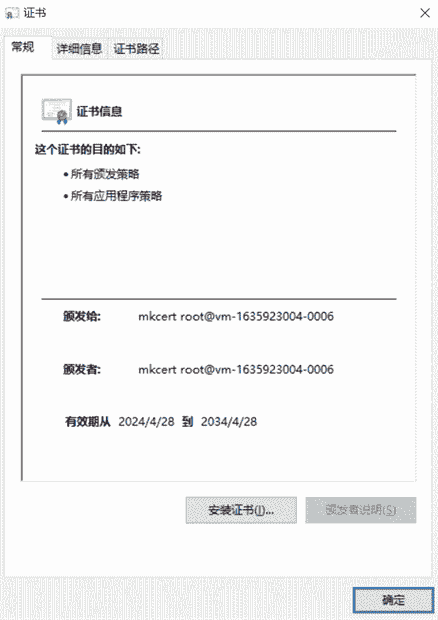
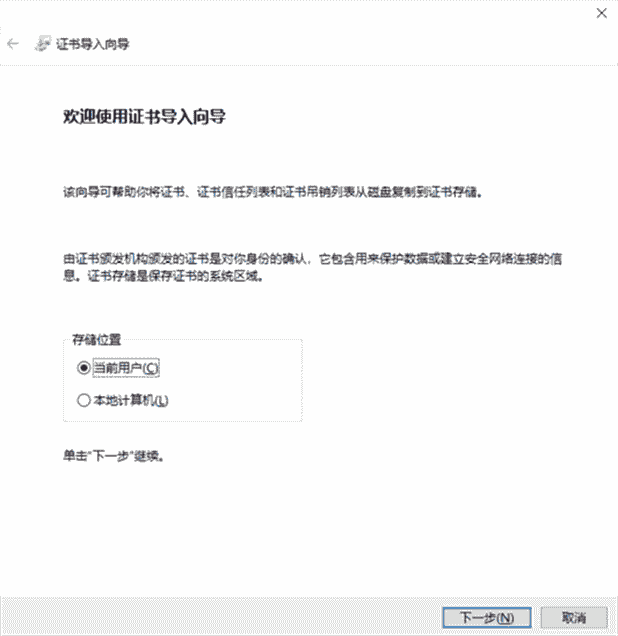

重启浏览器再次访问,可以看到连接已经变为安全
# 程序命令安装
在Windows操作系统中,可以使用certutil命令来安装证书
# -addstore 将证书添加到存储
# root 存储的名称 如果你的证书不是根证书,可能需要将root替换为CA、My或其他适当的存储名称。
# C:\path\to\certificate.cer是证书文件的路径
certutil -addstore root C:\path\to\certificate.cer
2
3
4
如果你有一个PFX格式的证书,并且需要指定导入时的密码
# password 替换为PFX证书的实际密码
certutil -addstore root C:\path\to\certificate.pfx "password"
2
go程序代码参考样例:
cmd := exec.Command("certutil", "-addstore", "root", "C:\path\to\certificate.pem")
err := cmd.Run()
if err != nil {
		log.Error("run cmd error: %v, %s", err)
	}
2
3
4
5
参考文档:https://www.cnblogs.com/suv789/p/18102678
# 代码中使用
# 程序提供本地http接口监听
import (
	"crypto/tls"
	"errors"
	"fmt"
	"net"
	"strings"

	"github.com/gin-gonic/gin"
)

func Start() {
    r := gin.Default()

    r.GET("/test", test)

    // 开启http监听服务!
    httpLsn, err := net.Listen("tcp", "127.0.0.1:8899")
    if err != nil {
        log.Fatal("http listen failed: %v", err)
    }
    go r.RunListener(httpLsn)

    // 开始https监听服务
    cert, err := tls.LoadX509KeyPair("config/cert/httpsLsn.crt", "config/cert/httpsLsn.key")
    if err != nil {
        log.Error("api Certificate filed...")
        return
    }
    cfg := &tls.Config{
        Certificates: []tls.Certificate{cert},
        // 可以设置更多的TLS选项,比如ClientAuth
    }
    httpsLsn, err := tls.Listen("tcp", "127.0.0.1:443", cfg)
    if err != nil {
       log.Error("https Certificate filed...")
    }
    go r.RunListener(httpsLsn)
}
2
3
4
5
6
7
8
9
10
11
12
13
14
15
16
17
18
19
20
21
22
23
24
25
26
27
28
29
30
31
32
33
34
35
36
37
38
# 程序中RPC连接
import (
	"crypto/tls"
	"github.com/x-mod/tlsconfig"
	"net/rpc"
	"sdp-client/log"
)

var rpcClient *rpc.Client

// 创建RPC客户端
func CreateClient(addr string) error {
	tlsconf := tlsconfig.New(
		tlsconfig.CertKeyPair("config/cert/client.crt", "config/cert/client.key"),
		tlsconfig.CA("config/cert/ca.crt"),
	)
	conn, err := tls.Dial("tcp", addr, tlsconf)
	if err != nil {
		return err
	}
	// 全局对象
	rpcClient = rpc.NewClient(conn)
	log.Debug("create rpc client ok")
	return nil
}
2
3
4
5
6
7
8
9
10
11
12
13
14
15
16
17
18
19
20
21
22
23
24