Helm初入门
# 1.介绍
# 1.1 什么是Helm
每个成功的软件平台都有一个优秀的打包系统,比如Debian、Ubuntu的apt,Red Hat、CentOS的yum、Mac的brew。Helm则是Kubernetes上的包管理器,方便我们更好的管理应用。
# 1.2 为什么需要Helm
Helm到底解决了什么问题?为什么Kubernetes需要Helm?
答案是:Kubernetes能够很好地组织和编排容器,但它缺少一个更高层次的应用打包工具,而Helm就是来干这件事的。
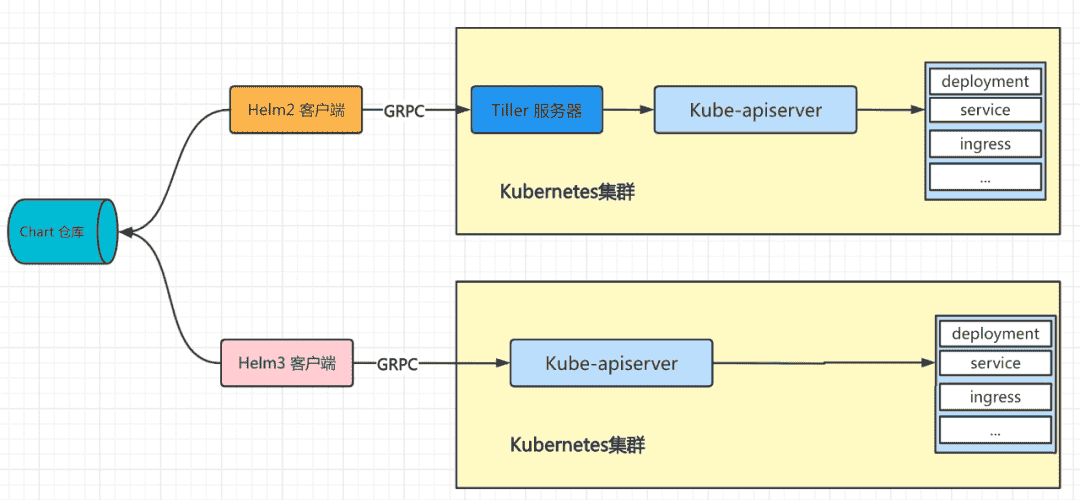
# 2. Helm架构
Helm2和Helm3架构
# 2.1 概念介绍
Chart: 是创建一个应用的信息集合,包括各种Kubernetes对象的配置模板、参数定义、依赖关系、文档说明等。chart是应用部署的自包含逻辑单元。可以将chart想象成apt、yum中的软件安装包。Release: 是chart的运行实例,代表了一个正在运行的应用。当chart被安装到Kubernetes集群,就生成一个release。chart能够多次安装到同一个集群,每次安装都是一个release。Repository:Charts仓库,用于集中存储和分发Charts。
# 3. Helm安装
Helm有个安装脚本可以自动拉取最新的Helm版本并在 本地安装。
$ curl -fsSL -o get_helm.sh https://raw.githubusercontent.com/helm/helm/main/scripts/get-helm-3
$ chmod 700 get_helm.sh
$ ./get_helm.sh
2
3
更多安装方法,可参见官方文档: https://helm.sh/zh/docs/intro/install/
# 4. Helm使用
# 4.1 添加仓库
因为Helm3没有默认的存储库,需要手动添加,推荐添加仓库https://charts.bitnami.com/bitnami,使用命令helm repo add来添加仓库,操作如下:
# 4.1.1 添加
# 添加仓库,并把仓库名设为bitnami
$ helm repo add bitnami https://charts.bitnami.com/bitnami
2
# 4.1.2 查看已添加列表
$ helm repo list
NAME                            URL
bitnami                         https://charts.bitnami.com/bitnami
2
3
# 4.2 搜索应用
Helm 自带一个强大的搜索命令,可以用来从两种来源中进行搜索:
helm search hub从 Artifact Hub 中查找并列出helm charts。Artifact Hub中存放了大量不同的仓库。helm search repo从你添加(使用helm repo add)到本地helm客户端中的仓库中进行查找。该命令基于本地数据进行搜索,无需连接互联网。
通过执行helm search hub 命令可以找到公开可用的charts,如果不进行过滤,helm search hub 命令会展示所有可用的 charts。
# 4.2.1 模糊搜索应用
从已添加的仓库(bitnami)列表中,搜索redis
$ helm search repo redis
NAME                  CHART VERSION APP VERSION DESCRIPTION
bitnami/redis         17.1.6        7.0.4       Redis(R) is an open source..
bitnami/redis-cluster 8.2.2         7.0.4       Redis(R) is an open source...
2
3
4
CHART VERSION是char的版本,APP VERSION是redis的版本
# 4.2.2 查看应用版本列表
$ helm search repo bitnami/redis -l
NAME                    CHART VERSION   APP VERSION DESCRIPTION
bitnami/redis           17.1.6          7.0.4       Redis(R) is an open source...
bitnami/redis           17.1.5          7.0.4       Redis(R) is an open source...
...
bitnami/redis           17.0.1          7.0.3       Redis(R) is an open source...
bitnami/redis           16.13.2         6.2.7       Redis(R) is an open source...
bitnami/redis           16.13.1         6.2.7       Redis(R) is an open source...
...
2
3
4
5
6
7
8
9
# 4.3 安装应用
通过命令helm install releaseName chartName来安装应用,releaseName指这次运行实例的名称,需要自己定义,chartName是char对应的仓库名,比如上面的bitnami/redis是redis的charName
# 4.3.1 安装redis
# 安装指定版本的redis,这里的version是chart的版本
$ helm install redis-server bitnami/redis --version=16.13.1
NAME: redis-server
LAST DEPLOYED: Tue Sep 20 12:37:26 2022
NAMESPACE: default # 部署到k8s中的命名空间
STATUS: deployed
REVISION: 1
TEST SUITE: None
NOTES:
CHART NAME: redis
CHART VERSION: 16.13.1
APP VERSION: 6.2.7

** Please be patient while the chart is being deployed **

Redis® can be accessed on the following DNS names from within your cluster:

    redis-server-master.default.svc.cluster.local for read/write operations (port 6379)
    redis-server-replicas.default.svc.cluster.local for read-only operations (port 6379)

# 下面是测试访问服务方法
To get your password run:
    # 1.设置环境变量
    export REDIS_PASSWORD=$(kubectl get secret --namespace default redis-server -o jsonpath="{.data.redis-password}" | base64 -d)

To connect to your Redis® server:

1. Run a Redis® pod that you can use as a client:
   # 2. 运行redis-client pod
   kubectl run --namespace default redis-client --restart='Never'  --env REDIS_PASSWORD=$REDIS_PASSWORD  --image docker.io/bitnami/redis:6.2.7-debian-11-r9 --command -- sleep infinity

   Use the following command to attach to the pod:
  # 3. 进入pod
   kubectl exec --tty -i redis-client --namespace default -- bash
2
3
4
5
6
7
8
9
10
11
12
13
14
15
16
17
18
19
20
21
22
23
24
25
26
27
28
29
30
31
32
33
34
# 4.3.2 查看对应的k8s信息
上面的安装命令,会自动将redis服务部署到Kubernetes中,我们不需要单独在写复杂的Service、Pod、PVC....
# 查看service,发现redis是主从模式
$ kubectl get service
NAME                    TYPE        CLUSTER-IP      EXTERNAL-IP   PORT(S)    AGE
redis-server-headless   ClusterIP   None            <none>        6379/TCP   2m22s
redis-server-master     ClusterIP   10.111.42.110   <none>        6379/TCP   2m22s
redis-server-replicas   ClusterIP   10.111.214.31   <none>        6379/TCP   2m22s
# 查看 pod
$ kubectl get pod
NAME                           READY   STATUS    RESTARTS      AGE
redis-server-master-0          1/1     Running   0             4m22s
redis-server-replicas-0        1/1     Running   0             4m22s
redis-server-replicas-1        1/1     Running   0             3m29s
redis-server-replicas-2        1/1     Running   0             2m47s
2
3
4
5
6
7
8
9
10
11
12
13
# 4.3.3 测试访问服务
# 进入测试端Pod
$ kubectl exec --tty -i redis-client --namespace default -- bash
# 登录redis
/$ redis-cli -h 10.108.225.221 -a ikcNrFDQr7
# 设置值
10.108.225.221:6379> set test 123
OK

# 登录redis服务端
$ kubectl exec -it  redis-server-master-0 -- bash
# 登录redis
/$ redis-cli -a ikcNrFDQr7
# 查看信息
127.0.0.1:6379> keys *
1) "test"
127.0.0.1:6379> get test
"123"
2
3
4
5
6
7
8
9
10
11
12
13
14
15
16
17
# 4.4 升级应用
# 4.4.1 查看当前版本
# 进入pod 中的容器
$ kubectl exec -it redis-server-master-0 -- bash
# 查看redis版本
$ redis-cli --version
redis-cli 6.2.7
2
3
4
5
# 4.4.2 升级
使用命令helm upgrade releaseName charName
$ helm upgrade redis-server bitnami/redis --version=17.0.1
Release "redis-server" has been upgraded. Happy Helming!
NAME: redis-server
LAST DEPLOYED: Tue Sep 20 19:12:24 2022
NAMESPACE: default
STATUS: deployed
REVISION: 2
TEST SUITE: None
NOTES:
CHART NAME: redis
CHART VERSION: 17.0.1
APP VERSION: 7.0.3

** Please be patient while the chart is being deployed **

Redis® can be accessed on the following DNS names from within your cluster:

    redis-server-master.default.svc.cluster.local for read/write operations (port 6379)
    redis-server-replicas.default.svc.cluster.local for read-only operations (port 6379)


To get your password run:

    export REDIS_PASSWORD=$(kubectl get secret --namespace default redis-server -o jsonpath="{.data.redis-password}" | base64 -d)

To connect to your Redis® server:

1. Run a Redis® pod that you can use as a client:

   kubectl run --namespace default redis-client --restart='Never'  --env REDIS_PASSWORD=$REDIS_PASSWORD  --image docker.io/bitnami/redis:7.0.3-debian-11-r0 --command -- sleep infinity

   Use the following command to attach to the pod:

   kubectl exec --tty -i redis-client \
   --namespace default -- bash

2. Connect using the Redis® CLI:
   REDISCLI_AUTH="$REDIS_PASSWORD" redis-cli -h redis-server-master
   REDISCLI_AUTH="$REDIS_PASSWORD" redis-cli -h redis-server-replicas

To connect to your database from outside the cluster execute the following commands:

    kubectl port-forward --namespace default svc/redis-server-master 6379:6379 &
    REDISCLI_AUTH="$REDIS_PASSWORD" redis-cli -h 127.0.0.1 -p 6379
2
3
4
5
6
7
8
9
10
11
12
13
14
15
16
17
18
19
20
21
22
23
24
25
26
27
28
29
30
31
32
33
34
35
36
37
38
39
40
41
42
43
44
45
# 4.4.3 验证
# 进入pod 中的容器
$ kubectl exec -it redis-server-master-0 -- bash
# 查看redis版本
$ redis-cli --version
redis-cli 7.0.3
2
3
4
5
# 4.5 回滚应用
每次对应用的操作(安装、升级、回滚),都会被保存起来,可以通过命令helm history releaseName查看历史操作信息,然后通过命令helm rollback releaseName 版本号来回滚到对应的版本。
# 4.5.1 查看历史版本
# 查看历史版本
$ helm history redis-server
REVISION UPDATED                  STATUS     CHART         APP VERSION DESCRIPTION
1        Tue Sep 20 18:09:32 2022 superseded redis-16.13.1 6.2.7       Install complete
2        Tue Sep 20 19:12:24 2022 deployed   redis-17.0.1  7.0.3       Upgrade complete
2
3
4
5
# 4.5.2 回滚到指定版本
# 回滚到指定版本,这里回滚到版本1
$ helm rollback redis-server 1
Rollback was a success! Happy Helming!
# 查看当前char版本,发现已经回滚到 6.2.7
$ helm list
NAME         NAMESPACE REVISION    STATUS    CHART           APP VERSION
redis-server default   3         deployed  redis-16.13.1      6.2.7
2
3
4
5
6
7
# 4.6 卸载应用
通过命令helm uninstall releaseName来卸载应用,执行如下:
# 卸载
$ helm uninstall redis-server
# 查看redis-server对应的历史操作
$ helm history redis-server
Error: release: not found
2
3
4
5
默认卸载应用后会删除与应用相关联的所有发布记录,如果还想继续保留发布记录信息,可以通过
helm uninstall releaseName --keep history,保留后的记录,并且依然可以通过helm rollback来回滚到删除前的版本。
# 5. 构建Chart
chart是Helm的核心。除了将它们安装到Kubernetes集群中或管理已安装的chart实例之外,还可以构建新chart或更改现有chart,
chart的设计目标:把Kubernetes作为一个有自己独特风格的平台。chart的核心是模板:该模板用于生成可以在集群中安装和管理的Kubernetes清单。
# 5.1 创建模板
helm create chartName可以轻松创建一个chart模板,里面包含所有必需的chart结构和文件,创建命令如下:
# 创建chart
$ helm create helloword
Creating helloword
2
3
# 5.2 目录介绍
# 查看目录
$ tree -L 2 helloword
helloword
├── Chart.yaml
├── charts
├── templates
│   ├── NOTES.txt
│   ├── _helpers.tpl
│   ├── deployment.yaml
│   ├── hpa.yaml
│   ├── ingress.yaml
│   ├── service.yaml
│   ├── serviceaccount.yaml
│   └── tests
│       └── test-connection.yaml
└── values.yaml
2
3
4
5
6
7
8
9
10
11
12
13
14
15
16
Chart.yaml: 描述chart的概要信息,charts:chart可以依赖于其他chart,被依赖的chart可以放进这个目录,目前这是个空目录。templates: 用于生成Kubernetes清单的模板存储在templates目录中.NOTES.txt: 安装chart时,NOTES.txt文件模板是被渲染和显示到(而不是被安装到)集群中,比如安装成功后的使用提示等。values.yaml: 当Helm渲染清单时传递给模板的默认值位于values.yaml文件中。实例化chart时,可以覆盖这些值。
# 5.3 修改values.yaml
默认生成的values.yaml里面有很多内容,这里只修改一些满足实例要求的配置信息。
replicaCount: 1 # pod 数量
fullnameOverride: "hello-word-app" # 服务名称
# 镜像信息
image:
  repository: docker.io/liuqinghui/gin-hello # docker镜像
  pullPolicy: IfNotPresent # 不存在则拉取镜像
  tag: "v1" # 镜像tag
# 服务配置信息
service:
  type: NodePort
  port: 80 # ClusterIP监听的端口
  targetPort: 80 # Pod监听的端口
  nodePort: 30001 # 端口范围在 30000~3276
2
3
4
5
6
7
8
9
10
11
12
13
# 5.4 打包
通过命令helm package path,将chart的文件和目录打包到单个归档文件中,便于后续安装和传输。
# 5.4.1 命令说明
$ helm package -h
...
Usage:
  helm package [CHART_PATH] [...] [flags]
# 部分参数说明
Flags:
  --app-version      # 可用于设置Chart.yaml文件的appVersion属性
  -u, --dependency-update # 创建存档文件之前更新依赖的chart
  -d, --destination  # 设置用于放置chart归档文件的位置
...
2
3
4
5
6
7
8
9
10
# 5.4.2 执行打包
$ helm package helloword
Successfully packaged chart and saved it to: /Users/liuqh/HelmRepo/helloword-0.1.0.tgz
2
# 5.5 校验
在开发chart时,尤其是使用YAML模板时,很容易出错或遗漏某些内容。为了帮助你捕捉错误和其他可疑元素,Helm客户端提供了一个代码校验器(linter),使用方式如下:
# 代码信息
$ ls
drwxr-xr-x  8 liuqh  staff   256  9 23 18:12 helloword
-rw-r--r--  1 liuqh  staff  3943  9 29 11:49 helloword-0.1.0.tgz
# 基于目录校验
$ helm lint helloword
==> Linting helloword
[INFO] Chart.yaml: icon is recommended

1 chart(s) linted, 0 chart(s) failed

# 基于打包后的文件校验
$ helm lint helloword-0.1.0.tgz
==> Linting helloword-0.1.0.tgz
[INFO] Chart.yaml: icon is recommended

1 chart(s) linted, 0 chart(s) failed

# 故意写错yaml语法,再次校验
$ helm lint helloword
==> Linting helloword
[ERROR] Chart.yaml: unable to parse YAML
 error converting YAML to JSON: yaml: line 2: mapping values are not allowed in this context
[ERROR] templates/: cannot load Chart.yaml: error converting YAML to JSON: yaml: line 2: mapping values are not allowed in this context
[ERROR] : unable to load chart
 cannot load Chart.yaml: error converting YAML to JSON: yaml: line 2: mapping values are not allowed in this context

Error: 1 chart(s) linted, 1 chart(s) failed
2
3
4
5
6
7
8
9
10
11
12
13
14
15
16
17
18
19
20
21
22
23
24
25
26
27
28
# 5.6 安装
# 5.6.1 基于打包文件安装
# 基于打包文件安装
$ helm install hello-word helloword-0.1.0.tgz
NAME: hello-word
LAST DEPLOYED: Thu Sep 29 15:24:24 2022
NAMESPACE: default
STATUS: deployed
REVISION: 1
NOTES:
1. Get the application URL by running these commands:
  export NODE_PORT=$(kubectl get --namespace default -o jsonpath="{.spec.ports[0].nodePort}" services hello-word-app)
  export NODE_IP=$(kubectl get nodes --namespace default -o jsonpath="{.items[0].status.addresses[0].address}")
  echo http://$NODE_IP:$NODE_PORT
2
3
4
5
6
7
8
9
10
11
12
# 5.6.2 查看服务信息
# helm服务列表
$ helm list
NAME       NAMESPACE REVISION    STATUS      CHART                APP VERSION
hello-word default   1         deployed  helloword-0.1.0        0.1.1
# 查看k8s service
$ kubectl get svc
NAME             TYPE        CLUSTER-IP     EXTERNAL-IP   PORT(S)        AGE
hello-word-app   NodePort    10.101.62.30   <none>        80:30001/TCP   7m11s
# 查看k8s deploy
$ kubectl get deploy
NAME            READY   UP-TO-DATE  AVAILABLE   AGE    IMAGES                             ...
hello-word-app   1/1     1           1         7m46s   docker.io/liuqinghui/gin-hello:v1  ...
# 查看k8s pod
$ kubectl get pod -o wide
NAME                            READY   STATUS  RESTARTS     IP            NODE    ...
hello-word-app-d467dbcd8-g796n  1/1     Running   0       10.244.104.9     node2   ...
2
3
4
5
6
7
8
9
10
11
12
13
14
15
16