集群部署
all节点: 代表所有节点所在服务器都需要安装。
# 1.添加k8s软件源(all节点)
cat <<EOF > /etc/yum.repos.d/kubernetes.repo
[kubernetes]
name=Kubernetes
baseurl=http://mirrors.aliyun.com/kubernetes/yum/repos/kubernetes-el7-x86_64
enabled=1
gpgcheck=0
repo_gpgcheck=0
gpgkey=http://mirrors.aliyun.com/kubernetes/yum/doc/yum-key.gpg
        http://mirrors.aliyun.com/kubernetes/yum/doc/rpm-package-key.gpg
EOF
2
3
4
5
6
7
8
9
10
# 2. 安装 kubeadm、kubelet、kubectl(all节点)
$ yum install kubelet kubeadm kubectl -y
# 3. 启动kubelet服务(all节点)
# 设置开机启动
$ systemctl enable kubelet.service --now
2
# 4. 初始化集群(master节点)
# 4.1 配置文件
# a. 下载默认配置文件
# 创建目录 /usr/local/kubernetes
$ mkdir -p  /usr/local/kubernetes
# 下载默认配置
$ kubeadm config print init-defaults --component-configs KubeletConfiguration > kubeadm.yaml
2
3
4
# b. 修改配置文件
# 修改1: advertiseAddress
localAPIEndpoint:
  advertiseAddress: 192.168.148.130  # 指定master节点内网IP
...
# 修改2:修改master节点名称
nodeRegistration:
  ...
  name: master # 修改master节点名称


# 修改3:新增 kubeproxy.config节点,并把kube-proxy模式为ipvs,默认为iptables
---
apiVersion: kubeproxy.config.k8s.io/v1alpha1
kind: KubeProxyConfiguration
mode: ipvs
...
# 修改4: 设置imageRepository为阿里云的registry,避免因gcr被墙,无法直接拉取镜像
imageRepository: registry.aliyuncs.com/google_containers
...

# 修改5: 指定k8s版本号,默认这里忽略了小版本号
kubernetesVersion: 1.24.2
...

# 修改6: 确认设置kubelet的cgroupDriver为systemd
---
apiVersion: kubelet.config.k8s.io/v1beta1
...
cgroupDriver: systemd

# 修改7: 指定 pod 子网
networking:
  dnsDomain: cluster.local
  serviceSubnet: 10.96.0.0/12
  podSubnet: 10.244.0.0/16  # 指定 pod 子网
2
3
4
5
6
7
8
9
10
11
12
13
14
15
16
17
18
19
20
21
22
23
24
25
26
27
28
29
30
31
32
33
34
35
# 4.2 拉取容器镜像
# 根据配置文件拉取镜像
$ kubeadm config images pull --config /usr/local/kubernetes/kubeadm.yaml
[config/images] Pulled registry.aliyuncs.com/google_containers/kube-apiserver:v1.24.2
[config/images] Pulled registry.aliyuncs.com/google_containers/kube-controller-manager:v1.24.2
[config/images] Pulled registry.aliyuncs.com/google_containers/kube-scheduler:v1.24.2
[config/images] Pulled registry.aliyuncs.com/google_containers/kube-proxy:v1.24.2
[config/images] Pulled registry.aliyuncs.com/google_containers/pause:3.7
[config/images] Pulled registry.aliyuncs.com/google_containers/etcd:3.5.3-0
[config/images] Pulled registry.aliyuncs.com/google_containers/coredns:v1.8.6
2
3
4
5
6
7
8
9
# 4.3 启动集群
# 根据配置文件启动镜像
$ kubeadm init --config /usr/local/kubernetes/kubeadm.yaml
[init] Using Kubernetes version: v1.24.2
[preflight] Running pre-flight checks
[WARNING Hostname]: hostname "node" could not be reached
[WARNING Hostname]: hostname "node": lookup node on 202.106.0.20:53: no such host
[preflight] Pulling images required for setting up a Kubernetes cluster
[preflight] This might take a minute or two, depending on the speed of your internet connection
[preflight] You can also perform this action in beforehand using 'kubeadm config images pull'
[certs] Using certificateDir folder "/etc/kubernetes/pki"
[certs] Generating "ca" certificate and key
[certs] Generating "apiserver" certificate and key
[certs] apiserver serving cert is signed for DNS names [kubernetes kubernetes.default kubernetes.default.svc kubernetes.default.svc.cluster.local node] and IPs [10.96.0.1 192.168.148.130]
[certs] Generating "apiserver-kubelet-client" certificate and key
[certs] Generating "front-proxy-ca" certificate and key
[certs] Generating "front-proxy-client" certificate and key
[certs] Generating "etcd/ca" certificate and key
[certs] Generating "etcd/server" certificate and key
[certs] etcd/server serving cert is signed for DNS names [localhost node] and IPs [192.168.148.130 127.0.0.1 ::1]
[certs] Generating "etcd/peer" certificate and key
[certs] etcd/peer serving cert is signed for DNS names [localhost node] and IPs [192.168.148.130 127.0.0.1 ::1]
[certs] Generating "etcd/healthcheck-client" certificate and key
[certs] Generating "apiserver-etcd-client" certificate and key
[certs] Generating "sa" key and public key
[kubeconfig] Using kubeconfig folder "/etc/kubernetes"
[kubeconfig] Writing "admin.conf" kubeconfig file
[kubeconfig] Writing "kubelet.conf" kubeconfig file
[kubeconfig] Writing "controller-manager.conf" kubeconfig file
[kubeconfig] Writing "scheduler.conf" kubeconfig file
[kubelet-start] Writing kubelet environment file with flags to file "/var/lib/kubelet/kubeadm-flags.env"
[kubelet-start] Writing kubelet configuration to file "/var/lib/kubelet/config.yaml"
[kubelet-start] Starting the kubelet
[control-plane] Using manifest folder "/etc/kubernetes/manifests"
[control-plane] Creating static Pod manifest for "kube-apiserver"
[control-plane] Creating static Pod manifest for "kube-controller-manager"
[control-plane] Creating static Pod manifest for "kube-scheduler"
[etcd] Creating static Pod manifest for local etcd in "/etc/kubernetes/manifests"
[wait-control-plane] Waiting for the kubelet to boot up the control plane as static Pods from directory "/etc/kubernetes/manifests". This can take up to 4m0s
[apiclient] All control plane components are healthy after 10.508558 seconds
[upload-config] Storing the configuration used in ConfigMap "kubeadm-config" in the "kube-system" Namespace
[kubelet] Creating a ConfigMap "kubelet-config" in namespace kube-system with the configuration for the kubelets in the cluster
[upload-certs] Skipping phase. Please see --upload-certs
[mark-control-plane] Marking the node node as control-plane by adding the labels: [node-role.kubernetes.io/control-plane node.kubernetes.io/exclude-from-external-load-balancers]
[mark-control-plane] Marking the node node as control-plane by adding the taints [node-role.kubernetes.io/master:NoSchedule node-role.kubernetes.io/control-plane:NoSchedule]
[bootstrap-token] Using token: abcdef.0123456789abcdef
[bootstrap-token] Configuring bootstrap tokens, cluster-info ConfigMap, RBAC Roles
[bootstrap-token] Configured RBAC rules to allow Node Bootstrap tokens to get nodes
[bootstrap-token] Configured RBAC rules to allow Node Bootstrap tokens to post CSRs in order for nodes to get long term certificate credentials
[bootstrap-token] Configured RBAC rules to allow the csrapprover controller automatically approve CSRs from a Node Bootstrap Token
[bootstrap-token] Configured RBAC rules to allow certificate rotation for all node client certificates in the cluster
[bootstrap-token] Creating the "cluster-info" ConfigMap in the "kube-public" namespace
[kubelet-finalize] Updating "/etc/kubernetes/kubelet.conf" to point to a rotatable kubelet client certificate and key
[addons] Applied essential addon: CoreDNS
[addons] Applied essential addon: kube-proxy

Your Kubernetes control-plane has initialized successfully!

To start using your cluster, you need to run the following as a regular user:

  mkdir -p $HOME/.kube
  sudo cp -i /etc/kubernetes/admin.conf $HOME/.kube/config
  sudo chown $(id -u):$(id -g) $HOME/.kube/config

Alternatively, if you are the root user, you can run:

  export KUBECONFIG=/etc/kubernetes/admin.conf

You should now deploy a pod network to the cluster.
Run "kubectl apply -f [podnetwork].yaml" with one of the options listed at:
  https://kubernetes.io/docs/concepts/cluster-administration/addons/

Then you can join any number of worker nodes by running the following on each as root:

kubeadm join 192.168.148.130:6443 --token abcdef.0123456789abcdef \
 --discovery-token-ca-cert-hash sha256:c82ee852e2e5e276c5c60b836cb1fa154e630ecb0a98dd0b73984b82cbbfa420
2
3
4
5
6
7
8
9
10
11
12
13
14
15
16
17
18
19
20
21
22
23
24
25
26
27
28
29
30
31
32
33
34
35
36
37
38
39
40
41
42
43
44
45
46
47
48
49
50
51
52
53
54
55
56
57
58
59
60
61
62
63
64
65
66
67
68
69
70
71
72
73
74
75
# 5. 添加节点
# 5.1 加入集群(在节点执行)
# 在 `node1`和`node2`执行以下命令,加入集群
$ kubeadm join 192.168.148.130:6443 --token abcdef.0123456789abcdef \
> --discovery-token-ca-cert-hash sha256:bc891a4b5977f8d86c6e49aeffdecdb95db48183615831042c2462019d03419b
[preflight] Running pre-flight checks
[preflight] Reading configuration from the cluster...
[preflight] FYI: You can look at this config file with 'kubectl -n kube-system get cm kubeadm-config -o yaml'
[kubelet-start] Writing kubelet configuration to file "/var/lib/kubelet/config.yaml"
[kubelet-start] Writing kubelet environment file with flags to file "/var/lib/kubelet/kubeadm-flags.env"
[kubelet-start] Starting the kubelet
[kubelet-start] Waiting for the kubelet to perform the TLS Bootstrap...

This node has joined the cluster:
* Certificate signing request was sent to apiserver and a response was received.
* The Kubelet was informed of the new secure connection details.
2
3
4
5
6
7
8
9
10
11
12
13
14
# 5.2 节点报错 localhost:8080 was refused
# 报错信息
$ kubectl get nodes
W0720 18:18:30.467593    6025 loader.go:221] Config not found: /etc/kubernetes/admin.conf
The connection to the server localhost:8080 was refused - did you specify the right host or port?
2
3
4
原因是
kubectl命令需要使用kubernetes-admin来运行;解决方法如下:将主节点中的
/etc/kubernetes/admin.conf文件拷贝到从节点相同目录下,然后配置环境变量
# a. 解决方法
# 1.拷贝主节点/etc/kubernetes/admin.conf文件到从节点/etc/kubernetes/admin.conf

# 2.配置环境变量
$ echo "export KUBECONFIG=/etc/kubernetes/admin.conf" >> ~/.bash_profile
# 3.立即生效
$ source ~/.bash_profile
2
3
4
5
6
# b. 再次查看
[root@node2 ~]$ kubectl get nodes
NAME     STATUS     ROLES           AGE     VERSION
master   NotReady   control-plane   9m48s   v1.24.2
node1    NotReady   <none>          8m28s   v1.24.2
node2    NotReady   <none>          8m2s    v1.24.2
2
3
4
5
NotReady是因为没有安装网络组件。
# 6.包管理器helm
# 6.1 什么是helm
每个成功的软件平台都有一个优秀的打包系统,比如Debian、Ubuntu的apt,Red Hat、CentOS的yum。Helm则是Kubernetes上的包管理器。
Helm到底解决了什么问题?为什么Kubernetes需要Helm?答案是:
Kubernetes能够很好地组织和编排容器,但它缺少一个更高层次的应用打包工具,而Helm就是来干这件事的。
# 6.2 安装
# 下载包
[root@master tmp]$ wget https://get.helm.sh/helm-v3.9.0-linux-amd64.tar.gz
# 解压
[root@master tmp]$ tar -zxvf helm-v3.9.0-linux-amd64.tar.gz
# 移动二进制未加
[root@master tmp]$ mv linux-amd64/helm  /usr/local/bin/
# 验证
[root@master tmp]# helm version
version.BuildInfo{Version:"v3.9.0", GitCommit:"7ceeda6c585217a19a1131663d8cd1f7d641b2a7", GitTreeState:"clean", GoVersion:"go1.17.5"}
2
3
4
5
6
7
8
9
# 7. 使用helm部署Calico
选择calico作为k8s的Pod网络组件,下面使用helm在k8s集群中安装calico。
# 7.1 下载helm chart
[root@master helm] $ wget https://github.com/projectcalico/calico/releases/download/v3.23.1/tigera-operator-v3.23.1.tgz
# 7.2 安装
# 指定安装在命名空间为kube-system下
[root@master helm] $ helm install calico tigera-operator-v3.23.1.tgz -n kube-system
#
$ kubectl get pod -n kube-system | grep tigera-operator

# 所有都变成runing
[root@master helm]$ kubectl get pods -n calico-system
calico-kube-controllers-68884f975d-wt2c2   1/1     Running   0          119s
calico-node-68k58                          1/1     Running   0          119s
calico-node-n6dgb                          1/1     Running   0          119s
calico-node-p56rl                          1/1     Running   0          119s
calico-typha-57b74d64dc-p7ztw              1/1     Running   0          119s
calico-typha-57b74d64dc-rpvzb              1/1     Running   0          110s
2
3
4
5
6
7
8
9
10
11
12
13
# 7.3 查看当时节点状态(全部变成Ready)
[root@master helm]$ kubectl get nodes
NAME     STATUS   ROLES           AGE   VERSION
master   Ready    control-plane   20m   v1.24.2
node1    Ready    <none>          16m   v1.24.2
node2    Ready    <none>          15m   v1.24.2
2
3
4
5
# 8.验证DNS是否可用
# 运行并进入验证容器
$ kubectl run curl --image=radial/busyboxplus:curl -it

# 验证
[ root@curl:/ ]$ nslookup kubernetes.default
Server:    10.96.0.10
Address 1: 10.96.0.10 kube-dns.kube-system.svc.cluster.local

Name:      kubernetes.default
Address 1: 10.96.0.1 kubernetes.default.svc.cluster.local
2
3
4
5
6
7
8
9
10
# 9.使用helm部署ingress-nginx
为了便于将集群中的服务暴露到集群外部,需要使用Ingress。接下来使用Helm将ingress-nginx部署到Kubernetes上。Nginx Ingress Controller被部署在Kubernetes的边缘节点上。
# 9.1 设置边缘节点
这里将node1(192.168.148.131)作为边缘节点,打上Label:
[root@master kubernetes]$ kubectl label node node1 node-role.kubernetes.io/edge=
node/node1 labeled
2
# 9.2 下载ingress-nginx的helm chart
$ wget https://github.com/kubernetes/ingress-nginx/releases/download/helm-chart-4.1.2/ingress-nginx-4.1.2.tgz
# 9.3 编写install-ingress.yaml
controller:
  ingressClassResource:
    name: nginx
    enabled: true
    default: true
    controllerValue: "k8s.io/ingress-nginx"
  admissionWebhooks:
    enabled: false
  replicaCount: 1
  image:
    registry: docker.io
    image: unreachableg/k8s.gcr.io_ingress-nginx_controller
    tag: "v1.2.0"
    digest: sha256:314435f9465a7b2973e3aa4f2edad7465cc7bcdc8304be5d146d70e4da136e51
  hostNetwork: true
  nodeSelector:
    node-role.kubernetes.io/edge: ''
  affinity:
    podAntiAffinity:
        requiredDuringSchedulingIgnoredDuringExecution:
        - labelSelector:
            matchExpressions:
            - key: app
              operator: In
              values:
              - nginx-ingress
            - key: component
              operator: In
              values:
              - controller
          topologyKey: kubernetes.io/hostname
  tolerations:
      - key: node-role.kubernetes.io/master
        operator: Exists
        effect: NoSchedule
      - key: node-role.kubernetes.io/master
        operator: Exists
        effect: PreferNoSchedule
2
3
4
5
6
7
8
9
10
11
12
13
14
15
16
17
18
19
20
21
22
23
24
25
26
27
28
29
30
31
32
33
34
35
36
37
38
nginx ingress controller的副本数replicaCount为1,将被调度到node1这个边缘节点上。这里并没有指定nginx ingress controller service的externalIPs,而是通过
hostNetwork: true设置nginx ingress controller使用宿主机网络。
# 9.4 安装
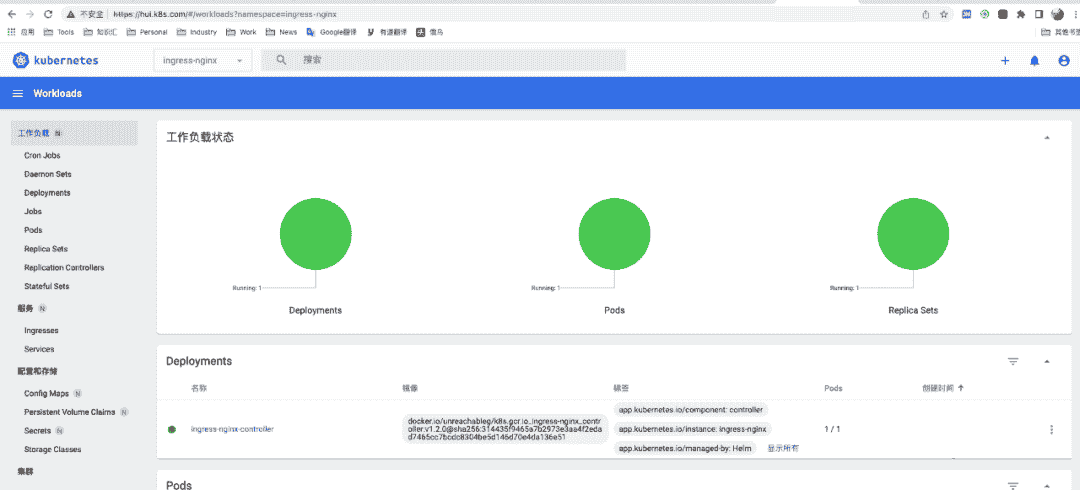
[root@master kubernetes]$ helm install ingress-nginx ingress-nginx-4.1.2.tgz --create-namespace -n ingress-nginx -f install-ingress.yaml
NAME: ingress-nginx
LAST DEPLOYED: Sun Jul 24 00:01:37 2022
NAMESPACE: ingress-nginx
STATUS: deployed
REVISION: 1
TEST SUITE: None
NOTES:
The ingress-nginx controller has been installed.
It may take a few minutes for the LoadBalancer IP to be available.
You can watch the status by running 'kubectl --namespace ingress-nginx get services -o wide -w ingress-nginx-controller'

...

If TLS is enabled for the Ingress, a Secret containing the certificate and key must also be provided:

  apiVersion: v1
  kind: Secret
  metadata:
    name: example-tls
    namespace: foo
  data:
    tls.crt: <base64 encoded cert>
    tls.key: <base64 encoded key>
  type: kubernetes.io/tls
2
3
4
5
6
7
8
9
10
11
12
13
14
15
16
17
18
19
20
21
22
23
24
25
测试访问http://192.168.148.131返回默认的nginx 404页,则部署完成。
# 10. 使用helm部署DashBoard
为了提供更丰富的用户体验,Kubernetes还开发了一个基于Web的Dashboard,用户可以用Kubernetes Dashboard部署容器化的应用、监控应用的状态、执行故障排查任务以及管理Kubernetes的各种资源。
在
Kubernetes Dashboard中可以查看集群中应用的运行状态,也能够创建和修改各种Kubernetes资源,比如Deployment、Job、DaemonSet等。用户可以Scale Up/Down Deployment、执行Rolling Update、重启某个Pod或者通过向导部署新的应用。Dashboard能显示集群中各种资源的状态以及日志信息。可以说,Kubernetes Dashboard提供了kubectl的绝大部分功能。
# 10.1 部署metrics-server
Metrics-Server是集群核心监控数据的聚合器。通俗地说,它存储了集群中各节点的监控数据,并且提供了API以供分析和使用。
# a. 下载配置文件
# 下载配置文件
[root@master ~]$ wget https://github.com/kubernetes-sigs/metrics-server/releases/download/metrics-server-helm-chart-3.8.2/components.yaml
2
# b. 修改配置
vim components.yaml
...
---
apiVersion: apps/v1
kind: Deployment
metadata:
  ...
spec:
  selector:
    matchLabels:
      k8s-app: metrics-server
  strategy:
    rollingUpdate:
      maxUnavailable: 0
  template:
    metadata:
      labels:
        k8s-app: metrics-server
    spec:
      containers:
      - args:
        - --cert-dir=/tmp
        - --secure-port=4443
        - --kubelet-preferred-address-types=InternalIP,ExternalIP,Hostname
        - --kubelet-use-node-status-port
        - --metric-resolution=15s
        #修改1:添加容器启动参数,方便跳过安全tls,生产不推荐使用
        - --kubelet-insecure-tls
        #修改2:更换镜像地址
        image: docker.io/unreachableg/k8s.gcr.io_metrics-server_metrics-server:v0.6.1
        imagePullPolicy: IfNotPresent
...
2
3
4
5
6
7
8
9
10
11
12
13
14
15
16
17
18
19
20
21
22
23
24
25
26
27
28
29
30
31
# c. 部署
# 部署资源
[root@master kubernetes]$ kubectl apply -f components.yaml
serviceaccount/metrics-server created
clusterrole.rbac.authorization.k8s.io/system:aggregated-metrics-reader created
clusterrole.rbac.authorization.k8s.io/system:metrics-server created
rolebinding.rbac.authorization.k8s.io/metrics-server-auth-reader created
clusterrolebinding.rbac.authorization.k8s.io/metrics-server:system:auth-delegator created
clusterrolebinding.rbac.authorization.k8s.io/system:metrics-server created
service/metrics-server created
deployment.apps/metrics-server created
apiservice.apiregistration.k8s.io/v1beta1.metrics.k8s.io created
# 查看状态
[root@master kubernetes]$ kubectl get pod -n kube-system | grep metrics
metrics-server-77cffb4988-gmbjd    1/1     Running   0             3m29s
2
3
4
5
6
7
8
9
10
11
12
13
14
# 10.2 添加对应的chart repo
# 添加chart
[root@master kubernetes]$ helm repo add kubernetes-dashboard https://kubernetes.github.io/dashboard/
"kubernetes-dashboard" has been added to your repositories

# 更新包
[root@master kubernetes]$ helm repo update
Hang tight while we grab the latest from your chart repositories...
...Successfully got an update from the "kubernetes-dashboard" chart repository
Update Complete. ⎈Happy Helming!⎈
2
3
4
5
6
7
8
9
# 10.3 定制char配置
image:
  repository: kubernetesui/dashboard
  tag: v2.5.1
ingress:
  enabled: true
  annotations:
    nginx.ingress.kubernetes.io/ssl-redirect: "true"
    nginx.ingress.kubernetes.io/backend-protocol: "HTTPS"
  hosts:
  - hui.k8s.com # 自定义域名
  tls:
    - secretName: example-com-tls-secret
      hosts:
      - hui.k8s.com
metricsScraper:
  enabled: true
2
3
4
5
6
7
8
9
10
11
12
13
14
15
16
# 10.4 安装部署
$ helm install kubernetes-dashboard kubernetes-dashboard/kubernetes-dashboard \
-n kube-system \
-f dashboard.yaml
2
3
# 10.5 访问
# a. 编辑hosts文件
# 编写本地 /etc/hosts 将hui.k8s.com指向一个node
192.168.148.131 hui.k8s.com
2
# b. 访问
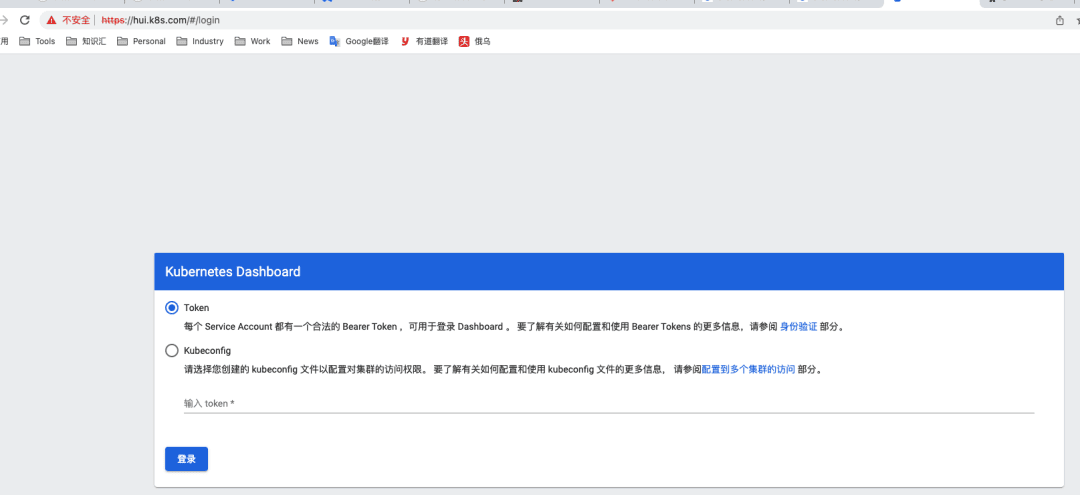
# c. 创建管理token
# 创建管理员  kube-dashboard-admin-hui
$ kubectl create serviceaccount kube-dashboard-admin-hui -n kube-system

# 在整个集群中为管理员 kube-dashboard-admin-hui 授权
$ kubectl create clusterrolebinding kube-dashboard-admin-hui \
--clusterrole=cluster-admin --serviceaccount=kube-system:kube-dashboard-admin-hui

# 创建集群管理员登录dashboard所需token:
$ kubectl create token kube-dashboard-admin-hui -n kube-system --duration=87600h
eyJhbGciOiJSUzI1NiIsImtpZCI6IkNNTWJmWHNkWXFERWhnbWtJWnB5TzNwYTB5OTJPM3cyUG52VjlRM3NGWGMifQ.eyJhdWQiOlsiaHR0cHM6Ly9rdWJlcm5ldGVzLmRlZmF1bHQuc3ZjLmNsdXN0ZXIubG9jYWwiXSwiZXhwIjoxOTc0MDgwNjg0LCJpYXQiOjE2NTg3MjA2ODQsImlzcyI6Imh0dHBzOi8va3ViZXJuZXRlcy5kZWZhdWx0LnN2Yy5jbHVzdGVyLmxvY2FsIiwia3ViZXJuZXRlcy5pbyI6eyJuYW1lc3BhY2UiOiJrdWJlLXN5c3RlbSIsInNlcnZpY2VhY2NvdW50Ijp7Im5hbWUiOiJrdWJlLWRhc2hib2FyZC1hZG1pbi1odWkiLCJ1aWQiOiJkMjNlMTg2NC1lZWY5LTQ0Y2MtOWIwNC1mZDU1ODk5MjU3ZmMifX0sIm5iZiI6MTY1ODcyMDY4NCwic3ViIjoic3lzdGVtOnNlcnZpY2VhY2NvdW50Omt1YmUtc3lzdGVtOmt1YmUtZGFzaGJvYXJkLWFkbWluLWh1aSJ9.gcztARblypyGUau_gUtwpdInNWwqL6qwKpCEpgiDkRJUCav4v3zEOPHnXhBlKRXi55HiA5gPsiSZdht5HpzGX8iWqXtdY3s2H72gNQQplbJoDAXXEwA1urBOAZ8X2A-B2yAFFndPvjmzjhd9ag3qGm3GZfFrKs9RcaZM-VeWjF7gQy6j0OR4cvjG913wn9POqeJr_zzSE6WNgqwD0VjYb7O9hln2VtCOi_o2Si-L3VyeVql-epnFaQIwNBJjlHyxulLeSZR-CWFbPv3vFlqDCrIgf81YSY0CS8-R6Axw3IAYxBCZi1Id-vrNQZc84IaLDBAlPfcMQ9cm2mBCi6Nklw
2
3
4
5
6
7
8
9
10
再次访问